New Dashboard Notice
Bolt has launched a new Merchant Dashboard experience. See this corresponding page for help documentation that reflects the Legacy Dashboard.
Please note that Legacy Dashboard documentation may no longer have up to date information on our newest features and releases.
Before You Start
- If you are migrating from a different cart platform, see the Re-platforming section.
- See the table below to ensure compatibility between Bolt and your version of Magento.
Supported Versions
How to Install
The location of the Magento 2 root folder depends on where you originally installed Magento and is also driven by your webhosting company. If you navigate to your Magento 2 root, you’ll see the following folders:
- app
- bin
- dev
- lib
- pub
- var
- vendor
Step 1: Upload Plugin
Open command prompt, go to <MAGENTO_ROOT> folder and run the following
commands:
$ composer require boltpay/bolt-magento2
$ php bin/magento setup:upgrade
$ php bin/magento setup:di:compile
$ php bin/magento setup:static-content:deploy
$ php bin/magento cache:clean
$ php bin/magento cache:flush
Step 2: Configure Plugin
- Login to the store admin panel.
- Navigate to Stores > Configuration > Sales > Payment Methods > Bolt Pay.
- Set the Enabled dropdown to
Yes. - Enter an appropriate Title such as
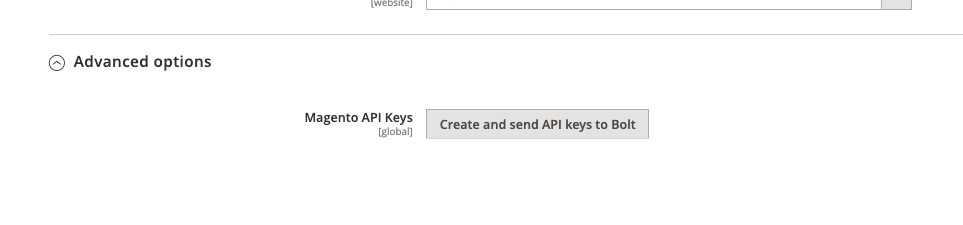
Credit & Debit Cards. - Send Magento 2 API Keys to Bolt. Go to Advanced Options, then click Create and send API keys to Bolt. This will send your M2 API credentials directly to Bolt to establish an OAuth connection.
Bolt API Credentials
The following values can be found in the Bolt Merchant Dashboard by navigating to Administration > API > API Keys. Scroll to Identifiers and set up at least one Publishable Key. The publishable key is a long string of lower and upper case letters and numbers that consists of three sections.

| Key | Description | Required? |
|---|---|---|
| API Key | Calls Bolt API from your back-end server | Yes |
| Signing Secret | Verifies signature by checking the authenticity of webhook requests | Yes |
| Publishable Key - Multi-Step | Opens the Bolt Payment Popup typically on Shopping cart and product pages | No |
| Publishable Key - Payment Only | Opens the Bolt Payment Popup typically on checkout pages | No |
| Publishable Key - Back-office | Used in the back office of Magento for manually-created orders. | No |
Each Publishable Key type requires a separate division is set up for your account.
Environments
Additional Settings
- Sandbox Mode: Setting up testing vs. production execution environment
- YES: Accepts test cards when placing an order
- NO: Requires real credit cards to place an order
- Replace Button Selectors: A comma-separated list of CSS selectors matching the elements to be replaced with Bolt Checkout buttons or Bolt checkout buttons placed alongside them:
- no suffix (default): inserts Bolt button in place of the element and removes the element
- append suffix: Inserts Bolt button right after the element (
example-selector|append) - prepend suffix: Inserts Bolt button right before the element (
example-selector|prepend)
Your Bolt Payment Plugin is now installed and configured.
Optional Configuration
Fraud Only
If you are using Bolt’s Fraud-Only offering, complete the following steps in addition to those previously listed:
- Log into the store admin.
- Navigate to Store > Configuration > Sales > Payment Methods > Bolt Pay.
- Insert your Bolt key credentials for all of the following:
- API key
- Signing Secret
- Publishable Key - Payment Only
- Scroll to the Where to add Bolt? section.
- Enable all of the following:
- Native Checkout Page
- Uncheck all of the other options.
- Ensure there is no CSS in the Global CSS section. (In particular, any styling that might prevent the original checkout button from displaying.)
Embeddable Account Editing
Enable account editing components on your site using our component setup guides.
Review Order Statuses & Platform Operations
You can review Magento Commerce order statuses and platform operations in our Platform Operations guide.
Update Plugin
Use the following script with Composer to upgrade to the latest Bolt M2 Plugin Version.
composer upgrade boltpay/bolt-magento2
php bin/magento setup:upgrade
php bin/magento setup:di:compile
php bin/magento setup:static-content:deploy
php bin/magento cache:clean
php bin/magento cache:flush
To upgrade to a specific Bolt M2 Plugin Version, please replace the first command with:
composer require boltpay/bolt-magento2:version
Check Version
See Magento Commerce’s documentation for more information.
Re-platforming
When re-platforming, you must keep in mind all of the following:
- Use the Merchant Dashboard for order refunds. Do not use a platform-specific backoffice flow that’s connected to a deprecated account division.
- Disable all of your old webhooks for the deprecated account division.